-
E-mail
ahhlby@126.com
-
Phone
17756952696
-
Address
Ruomao Road, Jingxian High tech Development Zone, Anhui Province
Product Categories
Anhui Huali Pump Industry Co., Ltd
HLY corrosion-resistant and wear-resistant submersible pump
NegotiableUpdate on 08/18
- Model
- Nature of the Manufacturer
- Producers
- Product Category
- Place of Origin
Overview
HLY corrosion-resistant and wear-resistant submersible pump
Product Details
1、 Introduction to HLY corrosion-resistant and wear-resistant submersible pump
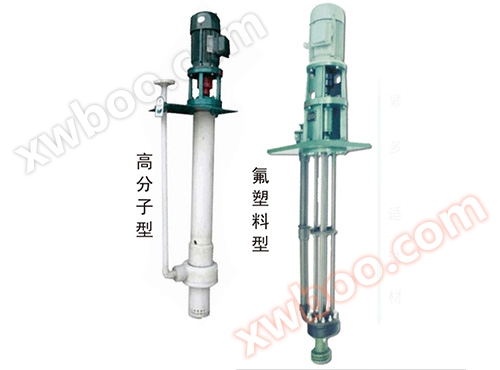
HLY submersible pump belongs to the vertical centrifugal pump series, and its flow-through components can be molded from ultra-high molecular weight polyethylene (UHMWPE) or injection molded from reinforced polypropylene. It has excellent corrosion and wear resistance and is suitable for transporting acidic or alkaline slurries or clear liquids within the range of -20~80.
The pump can also add a coupling between the motor shaft or pump shaft, enhancing the stability of the pump head operation and providing convenience for users' maintenance.

2、 Characteristics of HLY corrosion-resistant and wear-resistant submersible pump

3、 HLY corrosion-resistant and wear-resistant submersible pump structure

4、 Application scope of HLY corrosion-resistant and wear-resistant submersible pump
1. Non ferrous metal wet smelting industry: particularly suitable for the transportation of various acid liquids, alkali liquids, corrosive slurries, electrolytes, waste acids, sewage and other media in wet smelting of lead, zinc, gold, silver, copper, manganese, cobalt, rare earth and other materials.
2. Sulfuric acid phosphate fertilizer industry: transportation of dilute acid, mother liquor, fluorosilicic acid containing silica gel, phosphoric acid slurry and other media.
3. Water treatment and environmental protection industry: capable of transporting various types of wastewater with impurities.
4. Dyes and fine chemical industry: can transport clear liquids or slurries containing dilute acids, alkaline liquids, and mixed acids.
5. The suction and delivery of corrosive and non corrosive clear liquids or slurries in other industrial production processes.

5、 Installation instructions for HLY corrosion-resistant and wear-resistant submersible pump
1. Installation: First, fix the pump vertically in the desired position and connect the outlet pipeline.
2. Start: Connect the power point to start, check if the motor rotation direction is consistent with the arrow on the pump. If not, rewire and adjust the motor. After the motor runs normally, open the outlet valve to the desired working state.
3. Parking: The outlet valve should be closed first before turning off the power.
4. Disassembly:
(1) First, remove the infusion tube, then unscrew the filter cover, and finally unscrew the pump cover. Then, remove the cap assembly, impeller, and shaft sleeve in sequence.
(2) Next, you can unscrew pump body 1, unscrew the fitting cap, and then remove the K-ring.
5. Assembly: After replacing worn or damaged parts, assemble the pump in the reverse order of disassembly, paying special attention to the installation of gaskets in each part during assembly.
6. Inspection: After assembly, manually rotate the coupling to determine if it operates flexibly. If there is any abnormal noise, jamming, or other abnormal situation, the pump should be disassembled and inspected again. At the same time, it is necessary to clean up foreign objects, eliminate noise, adjust the gap between the impeller and the pump body by adding or removing impeller pads, and only connect the power when the operation is flexible. Follow the start-up procedure to put the pump into operation.
7. Caution: As most of the pump is made of plastic, it cannot be subjected to strong impact or twisting to avoid unnecessary damage.