-
E-mail
gdbaiyi@163.com
-
Phone
13926862045
-
Address
No. 168, Changxin Street, Tutang First Industrial Zone, Changping Town, Dongguan
Product Categories
Dongguan Billion General Machinery Co., Ltd

Circular cooling tower
NegotiableUpdate on 04/22
- Model
- Nature of the Manufacturer
- Producers
- Product Category
- Place of Origin
Overview
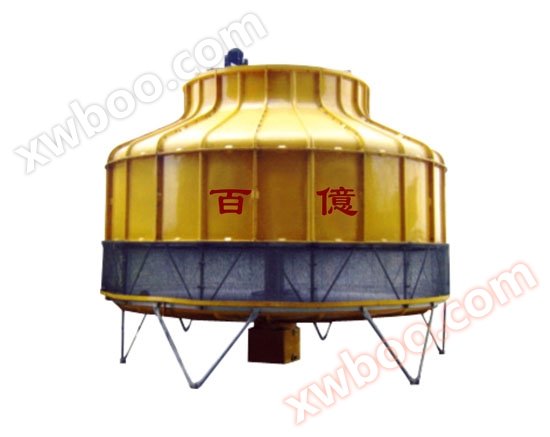
Product Description: Circular Cooling Tower - The circular cooling tower adopts counterflow gas heat exchange technology, with a main body made of all steel structure and fiberglass plate enclosure. The tower body is equipped with maintenance escalators for the normal maintenance and management of equipment at the top of the tower. Characteristics of circular cooling tower: Reasonable design: The "Billion" brand cooling tower actively pursues new environmental concepts in design, fully adopts new technology development, and comprehensively transforms the form and material of various components inside the cooling tower, making the product high-performance, with maximum cooling, less flying water, low noise, high strength, easy assembly, and easy maintenance, making this product suitable for various high demand places. Widely used: The "Billion" brand cooling tower has a wide range of applications, especially suitable for the air conditioning industry, refrigeration industry, dyeing industry, and provides extremely quiet cooling function for other general industries. The ultra quiet and environmentally friendly design is highly suitable for installation in noise controlled areas as its operating volume has been reduced to the lowest level.
Product Details
 |
Circular cooling tower Circular cooling tower |

Product Description:
Commodity Description

Circular cooling tower - The circular cooling tower adopts counterflow gas heat exchange technology, with a main body made of all steel structure and surrounded by fiberglass plates. The tower body is equipped with maintenance escalators for the normal maintenance and management of equipment at the top of the tower.
Characteristics of circular cooling tower:
Characteristic of Circular cooling tower
※Reasonable design:The "Billion" brand cooling tower actively pursues new environmental concepts in its design, fully adopts new technologies for development, and comprehensively transforms the form and material of various components inside the cooling tower, making the product high-performance, with maximum cooling, less flying water, low noise, high strength, easy assembly, and maintenance, making it suitable for various high demand places.
※ Widely used:The "Billion" brand cooling tower has a wide range of applications, especially suitable for the air conditioning industry, refrigeration industry, dyeing industry, and provides extremely quiet cooling function for other general industries. The ultra quiet and environmentally friendly design is highly suitable for installation in noise controlled areas as its operating volume has been reduced to the lowest level.
General Assembly Drawing
Assembly drawing
Installation preparation work
Installation preparation
※1. Upon arrival at the construction site, count the components according to the shipping list and check if the packing list matches the actual item.
※2. Please read all installation programs before starting the installation.
※3. Check if the foundation matches the sample or the foundation diagram provided by our technical department.
Install water basin
Install birdbath
※1. First, select the correct installation position for the cooling tower and prepare the concrete or steel structure foundation according to the instructions. During the foundation fabrication, all installation surfaces must be on the same horizontal plane with a horizontal error of ± 3 mm.
※2. According to the direction of the inlet and outlet pipes of the cooling tower, place the bottom basin correctly on the prepared foundation, adjust the bottom basin feet, and make sure that the water basin is on the same horizontal plane around it. As shown in the figure below:
※3. For the cooling tower with bottom frame structure, first connect the foot base, foot prop, bottom frame and other accessories correctly according to the requirements of the assembly diagram, and then adjust each bottom frame to be on the same horizontal plane. After the position is correct, tighten the anchor bolts or weld them between the footrest and the foundation to prevent the footrest from moving. As shown in the figure below:
※4. Tighten the bolts of each bottom basin in sequence and in stages. For assembled bottom basins, all bottom basins should be equipped with bolts and then tightened in two stages to avoid excessive gaps at the connection of the last bottom basin that cannot be connected. As shown in the figure below:
Install horizontal throat, curved throat, center pipe, intake support pillar, pipe position and center ring
Install the transverse
※1. Screw the threaded end of the transverse throat into the bottom basin's water drainage structure, and then insert the curved throat into the transverse throat. After assembly, ensure that the distance between the center of the curved throat and the surrounding area of the bottom basin is equal. After fixing the position of the PVC curved throat, apply an appropriate amount of PVC glue to the connection gaps between the transverse throat and the curved throat, and between the central pipe and the curved throat, respectively, to make the connection between the curved throat and the transverse throat, and the central pipe firm. For FRP curved throats, fibers should be made at the connection points between the curved throat and the transverse throat, and between the central throat, to prevent hot water from seeping out from the gaps. As shown in the following figure:
※2. Insert the central tube into the curved throat, ensuring that the centerline of the central tube is perpendicular to the horizontal plane.
※3. According to the position of the surrounding holes on the bottom frame, correctly install the air intake pillar on the bottom frame. During installation, the bolts between the air intake pillar and the bottom frame should not be tightened too tightly to facilitate the installation of the shell and film holder. As shown in the figure below:
※4. Correctly fix the pipe position (large clamp) on the central pipe. For low-noise and ultra-low noise cooling towers, the installation direction of the pipe position should be adjusted during installation to ensure that the low-noise bracket is correctly placed on the edge of the bottom basin.
※5. Fix the center ring (steel ring) correctly on the center tube, determine the direction, and tighten the fixing bolts.
Assemble film frame and film mesh
Assembly film frame, film network
※1. Connect the film main frame, center ring, and air intake pillar together with bolts, taking care not to tighten the bolts too tightly.
※2. For cooling towers with film auxiliary frames, use bolts to fix the film auxiliary frames to the main frame.
※3. If there is a large cooling tower with a middle frame, the middle frame should be assembled first, followed by the installation of the film frame and air inlet diagonal column, and then the middle frame and air duct should be installed.
※4. After checking that all parts have been installed in the correct position, tighten the fixing bolts of the film auxiliary frame, film main frame, etc., lay the film mesh on the film frame, and prepare to install the packing and shell.
Assemble packing and shell
Assembly packing and shell
※1. Prepare a batch of wooden boards first, and place them on top of the filling material for installation personnel to step on, ensuring that the filling material is not damaged during installation.
※2. Small cooling towers can directly stack the packing on the film rack, while large cooling towers should first place the film mesh on the film rack, and then place the packing around the center throat in the specified order according to the packing placement.
※When installing the filling material, the joints between layers should be staggered to prevent hot water from directly dripping into the bottom basin through the gaps, which may affect the cooling of the water.
※4. Small cooling towers can be equipped with shells after the packing is assembled, while large cooling towers can reserve one to two shells for entry and exit during packing installation without installation. The remaining shells can be installed first after the air intake pillar, middle pillar, and upper frame are assembled. During installation, place the casing on the air intake pillar, middle frame, and upper frame in sequence. Adjust the installation position and drill holes to secure the casing with bolts.
※5. After the installation of the casing is completed, correctly install the intake diagonal columns to the designated positions in sequence.
Assemble sprinkler system
Assembly sprinkler system
Installation of rotary head and sprinkler pipe
※1. Install the swivel head on the top of the central pipe. If the swivel head is connected to the central pipe through threads, the radial fixing bolts must be tightened after tightening the swivel head. If it is connected through flanges, the upper and lower connecting bolts must be tightened to prevent the swivel head from loosening when the water pressure is too high.
※2. Screw or push the sprinkler pipe into the installation hole of the rotary head, and then fix the emergency nut and fixing bolt.
After the installation of the sprinkler pipe, the spray hole forms a 10 degree angle with the vertical plane, and when viewed from above, the swivel head rotates clockwise under the push of the sprinkler pipe. As shown in the figure below:
Installation of waterproof sleeve and tension support (see figure below)
※1. Place the waterproof sleeve horizontally on the sprinkler pipe, and fix it to the sprinkler pipe with stainless steel clamps at both ends.
※2. Fix one end of the tension support on the throat clamp at the end of the sprinkler pipe, and connect the other end to the adjustment screwBolt, connect the top umbrella together by adjusting the bolt.
※3. Adjust the bolts to ensure that the distance between each sprinkler pipe and the filling surface is consistent.
Assemble motor frame, motor, gearbox, fan
Assembly motor frame, motor, reducer, fan
※1. Place the motor frame on the upper edge of the casing, adjust its installation position to ensure that its center coincides with the circular axis of the casing. When fixing the motor frame and casing, it is best to install it at the reinforced ribs of the casing or at the joint between the casing and the casing (as shown in the diagram below)
※2. For a direct drive cooling tower, place the motor in the center of the motor frame and fix it with bolts. Then, install the fan on the motor shaft to ensure that the distance between the fan blade tail and the air duct is even. Finally, tighten the connecting bolts between the motor frame and the housing.
※3. When cooling the tower through a belt gearbox, the belt gearbox should be installed in the center of the motor frame first, and then the fan hub should be installed on the gearbox shaft. During installation, the flat surface of the fan hub is facing upwards, and the U-bolt is inserted from top to bottom.
※When installing an adjustable angle fan, the installation angle between all blades and the hub should be consistent. Generally, the scale on the blade handle and the middle scale of the hub should be aligned. After aligning the scale, fix the connecting bolts between the blades and the hub. At this time, check the height of each blade from the same point to the motor frame. If the heights are not consistent, loosen the bolts and adjust the blade angle. (As shown in the figure below)
※When installing the belt, it should be ensured that the upper plane of the belt box driven wheel and the lower plane of the motor driven wheel are on the same plane. If there is an error, the installation position of the belt box or motor should be adjusted to ensure its levelness. Place a steel ruler on the two pulleys as shown in the figure below, and adjust the pulleys on the motor shaft so that points A, B, C, and D on the pulleys are aligned
※6. Place the fan mesh on the motor frame and fix it to the housing and motor frame with bolts. Pay attention to the consistency between the fan blades and the hub numbers. Generally, the fan blades of small cooling towers have been assembled and shipped. For large cooling towers, the fan scale should be aligned with the middle scale line unless there are special requirements.
Install escalator (see figure below)
※1. According to the specific situation of the installation site, choose a location that is convenient for installing escalators on the water tower.
※2. The upper part of the escalator and the upper edge of the outer shell are fixed with bolts, and the lower part is fixed to the outer shell or bottom frame with ladder supports.
Bottom basin connection interface
Bottom basin interface
※1. First, clean the debris in the bottom basin, such as screws, nuts, or shredded film. If there are oil stains, they need to be cleaned with a solvent. The inner surface of the bottom basin must be completely dry before sealing, and the joints should be polished to facilitate fiber sealing.
※2. Fill a container with about two kilograms of resin each time, and add a certain amount of curing agent in proportion (resin: curing agent ratio of 100:2, at 25-30 degrees Celsius). The curing agent ratio can be adjusted appropriately according to the temperature.
※3. Brush the mixed resin evenly at the connection joint of the bottom pot (with a width of about 200mm), then lay a layer of fibers, apply another layer of resin, and use an oil brush to flatten the fibers until they are fully soaked in the resin. There should be no separation between the bottom pot and the fibers. The bottom fiber is usually laid in three layers. (As shown in Figures 1, 2, and 3 below)
※After the bottom fiber is cured, apply a layer of resin on it to ensure a smooth surface of the bottom fiber.
※2. The shelf life of resin is generally three months, please use it within the shelf life.
(Attention: Do not rush to remove excess fiber layers before the resin solidifies, as this may cause pinholes or bubbles at the interface, leading to water leakage.)
※3. Resin should be stored in a cool and shady place, away from direct sunlight, and fibers should be stored in a dry place.
Install float valves, water filters, overflow and replenishment systems, etc
Installation of float valve
※1. Prepare each item according to the specifications and models on the shipping list.
※2. Install each component sequentially at the corresponding interface (as shown in the diagram), where the water filter is connected to the outlet of the bottom basin, and the float valve is used in combination with the water replenishment system.
(Note: During normal operation, the water level in the bottom basin should be 30mm below the bottom of the air intake pillar, and the height of the lowest end of the full water outlet from the normal water level should be about 10mm.). )
Install the air intake grille
Installed in the ventilation network
Use P.V.C butterfly screws to sequentially fix the P.V.C air intake grille onto the air intake pillar.
Install edge and hood (suitable for ultra-low noise type)
Install side and hood
※1. Connect the long end of the triangle plate to the bottom of the shell with bolts and fix it to the shell.
※2. Fix the holes at the top of the perimeter on the other end of the triangular plate in sequence.
※3. Adjust the edges evenly and tighten all bolts.
※4. Connect the wind caps together with bolts, place them on the air duct for fixation, and tighten the bolts.
Precautions for installation of circular counter current cooling tower
Installation of circular counter current cooling tower
Installation site
1. Ground bearing capacity: Refer to the operating weight and safety factor of the cooling tower to verify the installation foundation bearing capacity.
2. Environmental conditions
※a. The shortest distance between the cooling tower and parallel buildings is S, as shown in Figure A;
※b. The shortest distance between two cooling towers together is also S, as shown in Figure A;
※c. Avoid installation in places with high levels of smoke, heat sources, and foreign objects falling;
※d. Not suitable for installation in places where corrosive gases are present;
※e. The installation location of the cooling tower must reserve space for pipeline configuration.
Installation essentials
※1. The foundation of the cooling tower needs to be made according to the dimensions required in the manual, and the tolerance of the foundation is±3mm。
※If using anchor bolts for connection, the anchor bolts should be tightened;
※3. Gas welding and electric welding are generally not allowed for tower bodies to prevent fires; If necessary, it should be carried out in accordance with fire safety regulations;
※4. Piping
a. The selection of piping size should be based on the connection size of the cooling tower. If it is too large, it will waste materials, and if it is too small, it will increase energy consumption;
b. The maximum elevation H for the installation height of water pump P and outlet pipe should be lower than the water level height of the water basin during normal operation, as shown in Figure B.
Dongguan Billion Machinery inherits the corporate spirit of Billion Group, adheres to the development strategy of "technological innovation, excellent quality, and perfect service", and the business tenet of "integrity, pragmatism, and law-abiding operation". Billion's leading products include industrial chiller series, mold temperature control series, crusher series, mixing series, cooling tower series, etc. If you want to learn more, please consult our online customer service, hotline: